


Sewing Tips & Tricks for Advanced Sewers
Once you have been learning your sewing machine for a while and feel confident that you are no longer a beginner, moving forward with your sewing may be something you want to do, either with new skills and techniques, or with sewing machines that have advanced features and capabilities.
While it does depend on your current skills and abilities, as well as your level of confidence, below we have provided some tips for those who wish to do more with their sewing. Even if you consider yourself a beginner, but feel you have a good idea of what’s involved, and have had plenty of practice, some of this may also be useful for you! As always, the team at our Brisbane based Janome Sewing Centre can guide you with advice and lessons over the phone, via email or in person, just ask when you next get in touch. It doesn’t matter if you are using a Janome sewing machine or another brand, we are here to help!
Top 5 Sewing Tips for Advanced Sewers
- Get familiar with trims and piping to sew something a bit different each time.
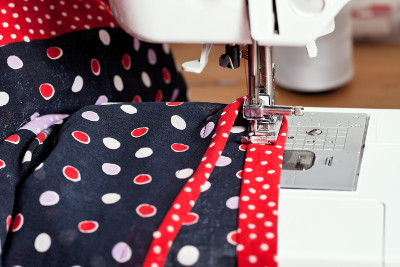 If you are yet to add some real flair to your sewing projects then it is time to begin. Why not add some individuality to your clothing by sewing some piping (also known as cording) and trims onto your designs. When done well, piping and trims can add eye-catching patterns and a bit of colour while accentuating the design lines of the piece. This approach is great for jazzing up basic items of clothing.
You can buy piping, or make your own using a piping foot, or zipper. In a printed fabric, trim is great for drawing attention to a particular colour. Start out easy by adding piping to waistbands, or trim to a jacket neckline. Once you feel confident you can sew other types of items such as pillows and handbags, and combine any number of trim and piping variations using different fabrics.
- Add some welt pockets to your clothes to add layers and a touch of individuality.
Welt pockets are the smaller, less bulky cousin of pocket flaps. These sort of pockets are often found on skin-hugging jeans, the outside and inside of a man’s suit jacket and even in purses. A welt pocket is customisable. You can sew single and double pockets with or without a flap or zipper. The great thing about these pockets is that the technique as such is fairly straightforward and once you have mastered it you can alter the pocket to suit any type of fabric, or pattern. Check out this helpful Welt Pocket Video to find out how to sew a welt pocket.
- Ensure longevity and seamless edges by adding underlining.
Ensure your clothing’s longevity by adding some underlining to your clothing sewing projects. Underlining is adaptable and has numerous advantageous. If you are using limp fabrics underlining stitching gives your attire structure so that once complete, your new outfit doesn’t hang off you like a loose rag. Underlining also adds strength to the clothing piece and reduces wrinkles (especially when using lightweight silk). If you interline your outerwear, it protects the fabric while instilling extra warmth and comfort thanks to the extra layer. Underlining is also perfect for giving the exposed edges of your clothes an immaculate, faultless edge for that professional, high-end, store-bought look.
- Find a sewing group, or community to swap advice, hints & tips and make friends.
The support and encouragement available when surrounded by like-minded people in a fun and collaborative environment can build your skills and dexterity quickly. By engaging with other sewing enthusiasts you will pick up hints, tips and different techniques you may never have come across on your own, so you are more likely to challenge yourself.
 There are a number of sewing groups around Brisbane. For a full-list overview of most of the major Brisbane sewing groups and guilds pop over to BrisStyle Inc. If you aren’t based in Brisbane, you can find a group close to you through the Australian Sewing Guild (cost for membership). Alternatively, you are also more than welcome to come into the Janome Sewing Centre at Everton Park Brisbane for a sewing lesson, or just have a chat.
- Try some complex garment construction by adding various dart designs to make your garment pop.
Try out some variations on your clothing projects and throw in different markings, shapes, patterns and designs to make your clothes distinctly yours. Why not bring the past into the present and mix things up by adding some dart designs to your shirts. Sewing darts correctly (or wedges as they are also called) requires accurate marking, stitching and pressing. These shapes can be either shaped, or tapered. They have a base, legs, fold and wedge points and can be sewn symmetrically on each side of the piece of clothing, or asymmetrically for something different.
The dart’s widest part is the base, it corresponds to a body area which needs less fabric as the base is where most of the material comes together. The wedge legs are stich-lines and all ought to be of identical lengths. The dart points are the end points and this is where most of the fabric is released over the body’s contour, for example, your hips, or bust.
Different darts you can get familiar sewing.
You should use tracing paper along with a tracing wheel to ensure you get a clear stitch line. It’s advisable to use fabric marking pencils, or pens to mark out the start, middle and end wedge points. Don’t forget to use thread tailoring tacks if you are using fine fabrics.
Plain darts are the most common wedge type and are found around the hips, waist and bust areas. This wedge can be modified to create different design elements such as princess seams and pleats.
Bust darts start at the side seam and travel up to the bust apex. This type of wedge makes the garment hug the body in a formfitting manner.
French darts are a variation of bust darts and are simply elongated and start lower by the waistline’s side seam, ending up near the bust apex.
Shoulder darts and neck darts give the clothing a feeling of femininity and distinguish similar style garments from one another, such as a man’s blazer from a woman’s blazer.
Waist darts are sewn into pants and ungathered skirts to add shape.
Dart tucks are similar to your standard wedges but the points are kept open to achieve a pleated look for billowy blouses and pants.
Elbow darts are found in couture clothing pieces and tailor made jackets. They ensure these sorts of garments have a fitted sleeve with enough room to move your arm comfortably and extend it fully. The elbow dart also accommodates the natural bend in your arm when it hangs by your side.
Double pointed darts involve joining wedges at their widest end parts, one end points down to the waist and the other points up to the bust. These are used to shape the middle of the clothing.
Curved darts are perfect to use when a basic dart simply doesn’t work. Such as when the straight-line basic wedge doesn’t have enough contour to appropriately adjust to your shape. You can stitch curved darts in a concave or convex style to suit.
Advanced Sewing Terms
When you move from the basics of sewing to more advanced techniques, there is a world of new information and terminology to take on board, to help you along here is an explanation of a few of the main sewing terms.
Baste: This is the method of creating a long stitch length on a sewing machine without using a back stitch or knot. This technique temporarily holds 2 pieces of material together before they are connected permanently.
Bias: This term refers to woven material which doesn’t stretch across the grain. The bias runs diagonally across the grain where the material loosens a bit. A garment made using an “on the bias” technique results in an elegant drape.
Free motion quilting: This process uses a darning foot to get rid of feed-dogs (the feet which move the material) so you can freely realign the material under the needle and use the thread to draw on it, creating any shape you desire.
Gusset: This is a triangle shaped piece of material which you stitch into seams to add some room. For instance when creating bags, the gusset squeezes the corners in to make the sides and bottom.
Selvage: The selvage of the fabric is the finished edge of the fabric that is on it when you buy it. Sometimes it is printed with the brand and helpful coordinating colors to use with the fabric, or it will be simply the same pattern as the fabric.
Smocking: A method where the garments pleats are brought together and folded into a checkerboard creating texture.
Top Stitch: To top stitch is to do a finishing stitch on top of an already sewn seam. For example, on a bag strap you might sew the strap together, turn it right side out and then do a top stitch to give it a nice finished look.
Using the Advanced Features of Your Sewing Machine
From a basic Janome sewing machine to any other basic make and model, these machines are great for learning the ropes and carrying out straightforward sewing jobs such as stitching, patching, hemming using basic patterns and uncomplicated edges with common fabrics and materials. However, when it comes to more complex projects you need a more advanced machine which can competently carry out a wide-range of tasks on a variety of common and much-less common materials and fabrics such as lace, leather, suede, velvet, matelassé, spandex, sequin beaded fabric and more.
If you own a Janome sewing machine and would like to get started trying out some of the more advanced sewing techniques we have mentioned, or try out other complex sewing projects, but are unsure of what your sewing machine can do, or how all its functions work then we have you covered. If you need a refresher on the ins-and-outs of operating your Janome sewing machine you can find the instruction manual for it on our website.
Feel free to get in touch with the team at Janome Sewing Centre, Everton Park Brisbane for any sewing advice you may need!