


How to Thread a Janome Overlocker 11
How to Thread a Janome Overlocker (Serger)
Threading is not only the first step in using a Janome overlocker, but threading an overlocker is the most important step, as faulty threading will result in no stitches or faulty stitches forming. Threading an overlocker might look challenging but following a few simple rules, threading will become easier and faster to accomplish in no time!
 Understanding the Overlock Stitch
Overlockers are a unique sewing machine built for a single purpose, with the ability for slight variations of what we use to secure the raw edges of fabric. Traditionally and even in today’s Haute Couture culture, the standard for fixed seams and edges would be hand stitching them shut. For the modern dressmaker, we compare our own garment making to that of commercially bought apparel, built for repeat wear and tear. The overlock stitch is simply stronger, more durable, and has a neat professional finish. Overlock machines, or ‘Sergers’ both cut the fabric and sew over this raw edge for a clean, secure edge.
How it’s Formed
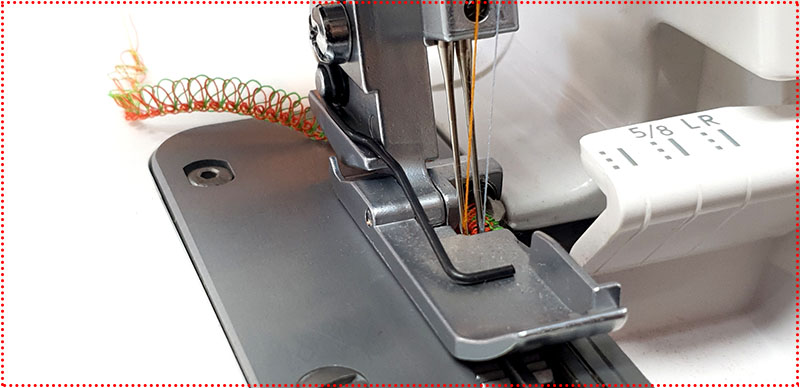
 Modern Overlockers are capable of 2, 3 and 4 thread overlocking, with some combination overlocker and coverhem machines sewing a 5 thread ‘safety stitch’. A common 4 thread overlock stitch is made using two needles and two loopers. An upper looper and lower looper carry thread left and right, linking together at the very edge of the cut fabric. The loops are what prevent fabric weave from unravelling through movement, wear or washing. The needle threads secure these loops in place with every stitch. Fabric passes a cutting blade before sewing, creating a neat, consistent edge free from wispy or lumpy threads. A chaining finger – small metal pin built into the machine or needle plate – holds the loops apart nice and flat, allowing the stitches to slide off with the fabric.. Variations of stitches can be made by removing one needle, or retracting the chaining finger for a rolled hem. Every machine is different, so be sure to check with us which machines can sew your desired finish.
Identifying Threading Paths
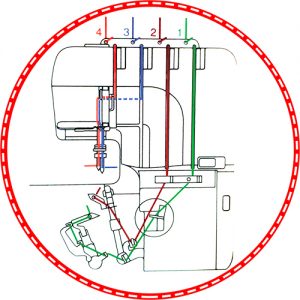 Because of the way the overlock stitch is formed, loopers must always be threaded before the needles, or at the very least if a looper thread breaks, pull your needle threads up from under the presser foot until ready to sew. From the right to the left, threading is usually marked 1. Lower Looper, 2. Upper Looper, 3. Right Needle, 4. Left Needle. The Lower Looper Thread, usually colour-coded green, is often the hardest to thread because it travels further through the machine. But! With a little understanding of your machine, you’ll love your loopers and what they do. Some machine are easier to thread than others, so get in touch and we can walk you through the many options Janome has available!
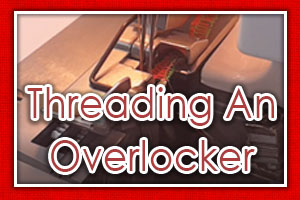
THREADING AN OVERLOCKER
 The easiest way to change threads is the tie-off technique. For this method all you need to do is loosen all your tensions, cut your threads above the tensions, tying the new colours on using a reef knot then ease the threads through each stage of threading.
Many Sewists swear by the tie-off technique for quick colour changing, but if you’re a beginner or if you experience thread breakage – threading an overlocker from scratch is an essential skill to know!
 For Overlockers with traditional dial setup – reduce your tensions to zero. For lay-in tension machines, raise the presser foot to open up the tension discs.
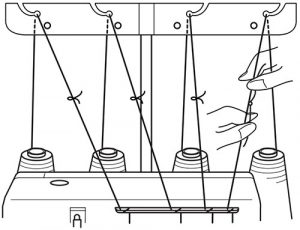
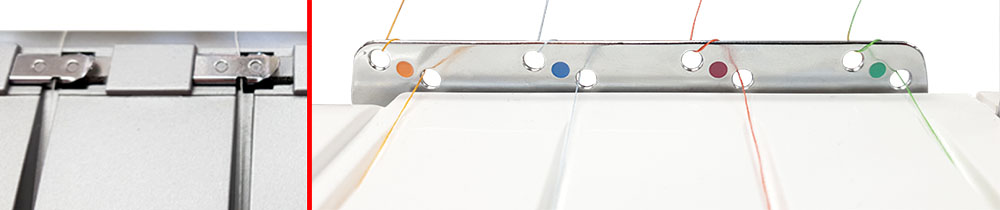
Extend your thread guide to its full height and mount your thread on the spool pins, draping it over [or threading through] the slots indicated.
Bring the thread down to the metal thread guide bar. If your machine has an easy clip thread guide, thread it as pictured. If your machine has a metal 2-hole thread guide plate, enter the left hole threading back-toward-front, then the right hole back-toward-front. Your thread should now be positioned pointing directly towards the thread tension path.
Open the front flap of the overlocker to show the coloured threading markers.
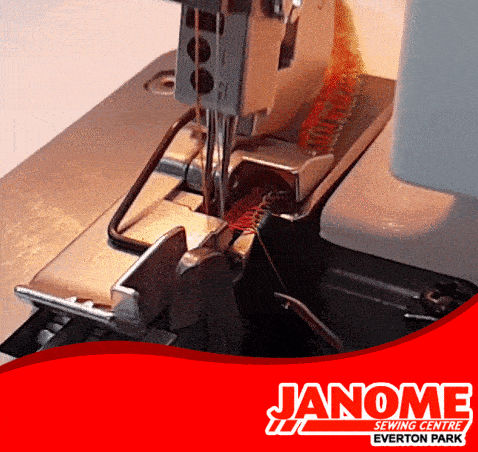
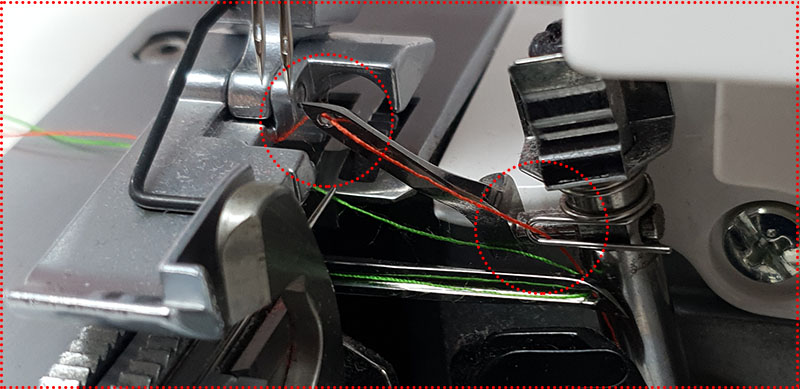
LOWER LOOPER: Thread First From The Right (Green Tension Dial)
Continue threading your lower looper thread by its colour coded markers. Traditional tension dial machines may need an extra tug to ensure thread is in the tension.

For machines with an easy clip-up lever, thread the two hooks that appear and then the looper. Disengage clip lever.
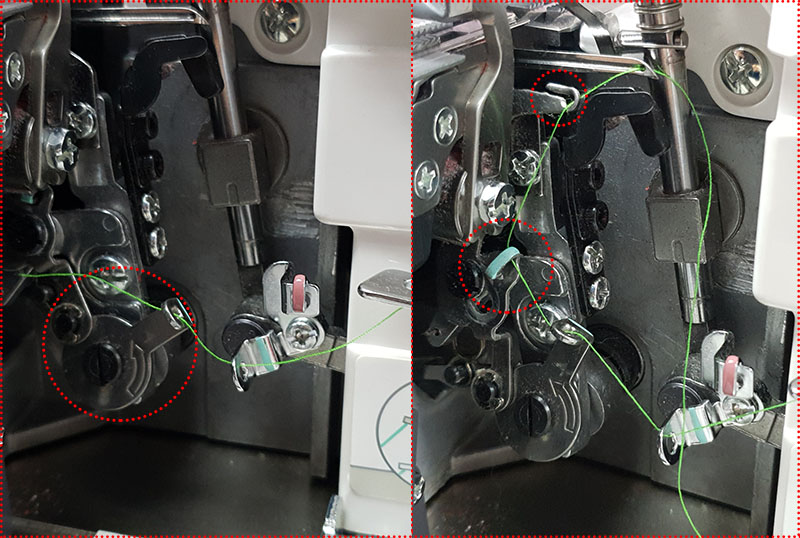
For machines without an easy-clip up lever, open the left wing cover of the machine, wind the looper all the way back using the handwheel and pass the thread through to the left, remembering to thread the inside clip-loop AND the back of the looper itself.
Return the looper to the right-hand position and bring the thread back to the right.
Thread the eye of the lower looper and pull the thread behind the presser foot.
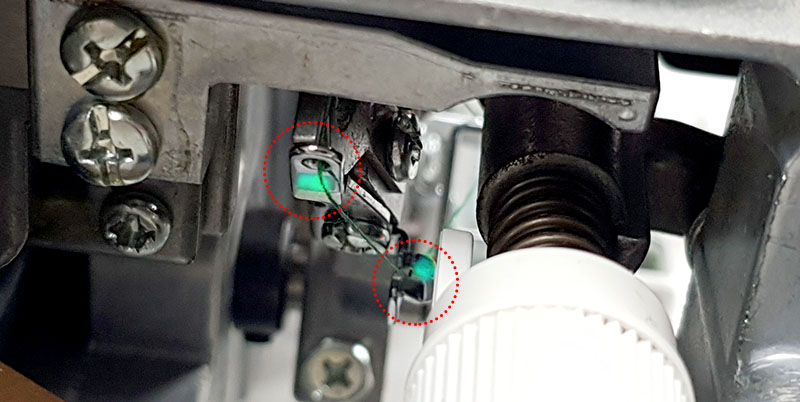
UPPER LOOPER: Thread Second From The Right (Red Tension Dial)
After threading through the tension, guide your upper looper thread through the red markers.
Tuck the Upper Looper thread behind the guide bar to the right of the upper looper.
Thread the eye of the Upper looper and pull the thread behind the presser foot.
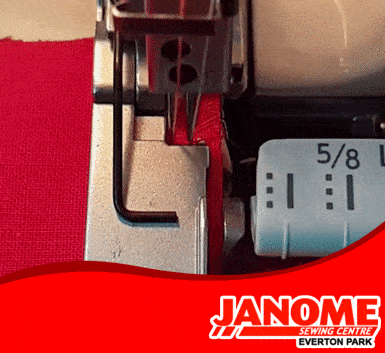
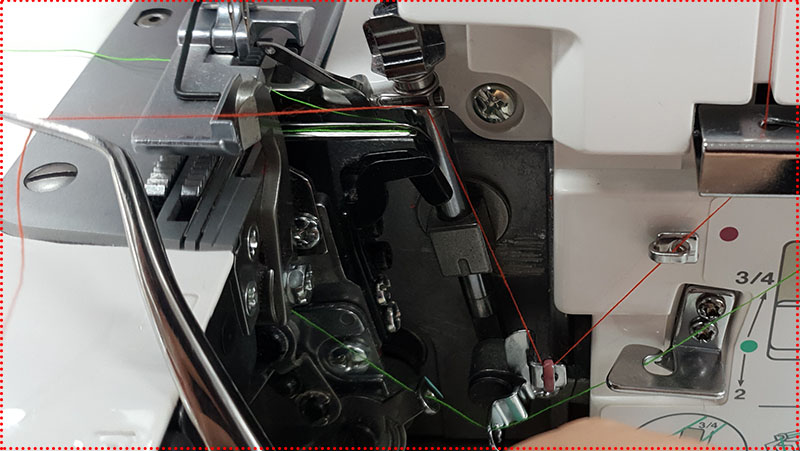
RIGHT NEEDLE: Thread Third From The Right (Blue Tension Dial)
The right hand needle travels to the left under two guides and over one guide to point directly down towards the needle.
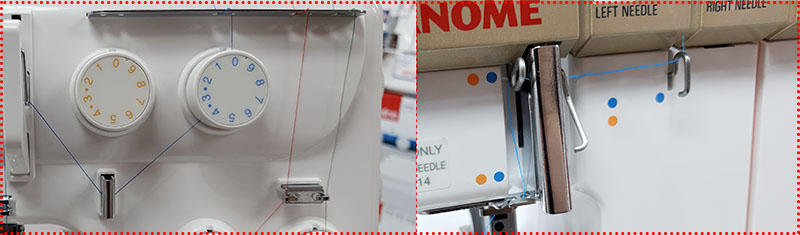
A metal thread guide will separate the right and left needle threads.
Push the right needle thread back and behind the needle clamp bar guide.
Thread the right hand needle and pull thread under the presser foot.
LEFT NEEDLE: Thread Fourth From The Right (Yellow Tension Dial)
The left hand needle travels to the left under one guide and over one guide to point directly down towards the needle.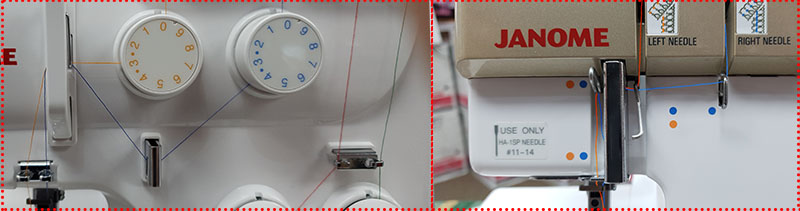
A metal thread guide will separate the right and left needle threads.
Push the left needle thread back and behind the needle clamp bar guide.
Thread the left hand needle and pull thread under the presser foot.
BEFORE SEWING!
Ensure that the Lower looper thread is draped OVER the upper looper.
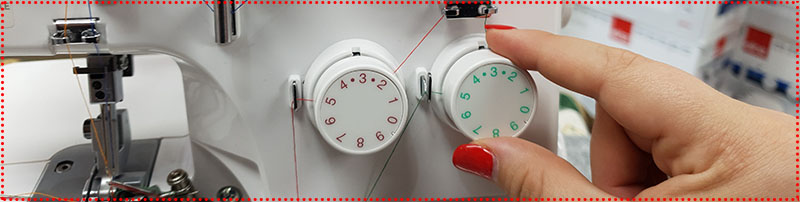
Engage tensions by returning tension dials to 3 or for lay-in tension machines, lower the presser foot.
Sew a couple of inches to chain-on. You’re now threaded and ready to sew!
SETTINGS
Setting the Janome Overlocker up to do a 3 & 4 Thread Overlocking Stitch is very easy with Janome Sergers and Overlockers. Simply follow the following settings when setting up your Janome Overlocker and you will be hemming to your heart’s content.
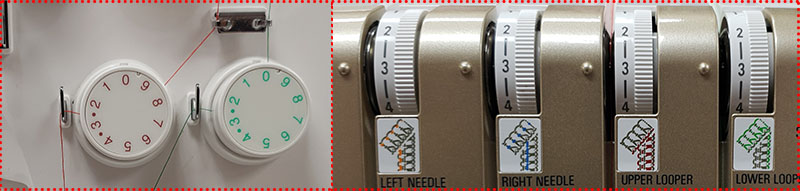
Tensions
– All four tension dials should be set to “3”
Stitch Length
– Set the Stitch Length dial to “3”
Differential Feed
– Set the Differential Feed Dial to “1”
Ensure that the upper knife is engaged and cutting the fabric
Tips and Tricks
► A threading diagram on the machine indicating the sequence and colour coding for each thread.
► Each thread’s path should be colour coded on the machine, from the thread stand to the needle or looper.
► Clip-off presser feet that enable you to reach the needles and loopers easily.
► Threading should always go from the right hand side thread to the left hand side thread
► Choose a good quality thread. (The original thread spools that came with machine are of a very high quality). To ensure that the tension is consistent on all four tensions, we recommend that you use the same type of thread for the loopers and the needles.
► Do not use woolly thread referred to as ‘flock’ or ‘floss’ in the needles, as this will keep on breaking, jamming, perhaps even breaking the needles.
► Thread one reel at a time, starting at the thread stand and following the indicated path up to the needle or looper.
► Bring all threads under the presser foot to the back and drop the presser foot.
► If you have a problem it is always better to remove the threads and start right from the beginning.
Which reels use the most thread?
Hi Kerry,
The lower looper – the far right hand spool – uses the most thread, as it has the longest track to pass through. It is then followed by the upper looper on the third spool, and the two needles are exactly the same.
Cheers,
Ryan
I have a Janome ezy lock 604D. My problem is my left needle thread doesnt seem to be sewing the thread just comes out straight. I have rethread i dont know h ow many times and im convinced i have threaded it correctly. Very frustrated. Any ideas what im doing wrong or could it be the machine. Louise
Hi Louise,
Thank you for your comment.
There are three possible reasons that your overlocker might be missing the left hand needle when stitching relates to either the needle or the timing of the machine. Most likely, the needle(s) might be either slightly damaged/bent or may not be push up completely. As this is the easiest potential solution, I would recommend changing the needles and seeing how it chains.
The other potential cause is that the timing of the loopers on your 604D is slightly out. If this is the case, I would recommend taking your overlocker to your local Janome Service Centre.
Kind Regards,
Adam
I have tried everything and can not get the left thread needle to loop. I have re-threaded dozens of times, I heard about timing on the loopers but can budge the screw on my lower looper without scarring the screw slots on my Juno Janome 3434D serger, I recently was serging too thick of materia and it ws jamming so after a day of trying to find the problem, I noticed a broken needle on the needle plate and replaced it, but still cannot get the left needle to loop, thought that was gonna fix the problem, help please!!!
Oh I forgot I had also put brand new needles in carefully making sure the were set right up inside.
Hi Nola,
Thank you for your comment.
From the sounds of what you are describing, there are several possible causes of your issue. If you would like to drop us a line on 07 3355 5522, or on our email address [email protected], we will be able to assist you properly.
Kind Regards,
Harrison
My 3434D has decided to just not work properly this morning after years of perfect use. I can’t get the rolled hem function to operate correctly. I’ve done this many many times with great results but this morning the top threads still want to not roll up. I’ve rethreaded MULTIPLE times. I’ve checked and rechecked tensions. All is in proper place. Crazy thing is that only the wide 4 thread serge function is great. I remove that left needle and go to 3 thread serge or rolled hem and that’s where things go crazy.
Hi Sheila,
Thank you for your comment.
There are a couple of possible reasons that your overlocker could be having that particular issue. Without having the machine to have a look at, at this stage I would recommend that you go through and try a fresh set of needles in your overlocker, and also check the forming needles on your needle plate. If those have become broken, it can potentially cause an issue with 3-thread and rolled hem overlocking.
Hopefully this helps Sheila, but if you do have any further questions, please let me know on [email protected] or on 07 3355 5522.
Cheers,
Harrison
The lower looper needle seems to come unthreaded. I have ‘re threaded every thread several times, changed needles, cleaned needle plate of any fluff, checked tension. It seems to go for a while then jam. Help! What am I doing wrong? Used this machine for over 4 years with no problems until mow
Hi Lorna,
Thank you for getting in touch with us. There are a couple of possible causes for those issues that you mentioned there. The most likely cause is that your threads have become brittle due to age, or that your tension has become worn due to extensive use. I would recommend that you take your machine along to an authorised Janome technician, as they will be best able to assist you. Please let me know if there is anything else I can assist you with, on 07 3355 5522 or at [email protected].
Kind Regards,
Harrison