


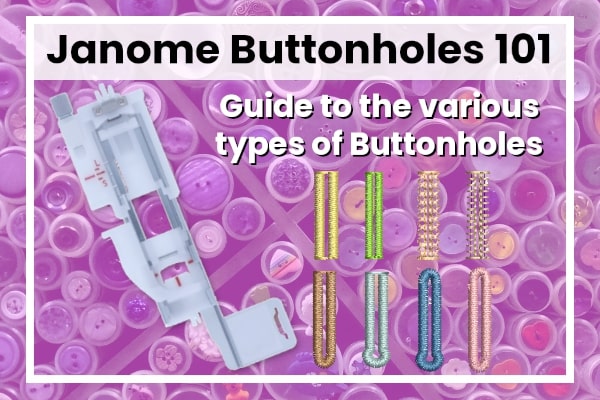
Buttonholes 101
 Janome Sewing Tips
Buttonholes 101
Buttonholes are stunning and can create the final touch to your sewing project. The problem is how do you get a perfect buttonhole every time and how do you know which one is right for your project. Do not worry! Sewing buttons with JANOME will help you get the perfect buttonhole every time and in many cases, in just 1-step. This guide is designed to help steer you through which buttonholes will be best for your sewing project and how to set up and sew out your chosen buttonhole. So, let’s grab our supplies and commence with sewing buttons 101!
TYPES OF BUTTONHOLES FOR YOUR PROJECT
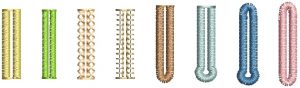
Before we learn how to sew the perfect buttonhole with a Janome Sewing Machine, we should first look at the different types of buttonholes your JANOME might have. Each buttonhole has a unique characteristic that will fit either the type of button, the style of your project or the fabric you wish to use. In this Buttonholes 101 guide, we will touch on 9 different buttonholes.
Round end
- Like the name implies it is rounded at one end and squared off at the other. This is your basic buttonhole and can be used for almost anything. It is ideal to use fine to medium weight fabrics like cotton and polyester. It should be your go-to buttonhole, especially for blouses, shirts and children’s clothing.
Fine fabric
- This buttonhole is rounded on both ends. It is intended for more delicate garments, to give them a polished look. Make sure to use it on finer fabrics like silk, linen or chiffon.
Keyhole
- The keyhole shape is perfect for those larger and thicker buttons. This buttonhole allows them to pass through the larger opening and then be secured on the squared-off end. This again is a universal buttonhole that can be used on medium to thick fabrics.
Rounded Keyhole
- It is remarkably like the previous buttonhole; however, this has a rounded end as opposed to the squared-off end. This timeless buttonhole is again great for medium weight fabric. The biggest difference is the refined look that the round end gives it.
Tailored
- Here we see another type of keyhole shape. This tailored buttonhole is a little heavier duty for those thick bulky buttons and heavy weighted fabric.
Stretch
- The zig zag pattern of the stretch buttonhole gives it a decorative look. The pretty stitch is not just for decoration, as the name implies it’s perfect for stretch fabrics of any weight.
Knit
- Suitable for knit fabrics. The beautiful pattern that is created by this buttonhole can be used for that ornamental touch. The lovely stitches help the buttonhole move and extend with any type of knit fabrics.
Antique
- This buttonhole mimics the beautiful heirloom stitch. It has a handmade intricate appearance and makes a nice decorative buttonhole for any medium to lightweight fabric.
Welted
- It is perfect for wool material and any fabrics that are firmly woven. Make sure to use fabrics that will not unravel. The stitching is made by strips or welts alongside the buttonhole. It gives a professional look to any garment and can handle those heavy fabrics.
Now that we know the different types of buttonhole stitches that are featured in the various Janome models, we can now move onto how to sew a buttonhole with your Janome. The following highlights the steps for a one-step buttonhole and a four-step buttonhole.
1-STEP BUTTONHOLE GUIDE
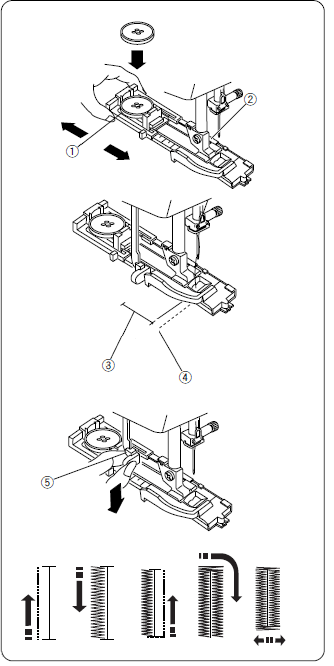 |
Step 1 – Find your JANOME buttonhole presser foot. This presser foot has an amazing feature to help make buttonholes easier. This feature allows you to make the correct size based on the button you have chosen. To use this, you will notice that the back of the presser foot slides open, select the button you have chosen for your sewing project and place it into the back of the presser foot. Step 2 – Now you can attach the buttonhole presser foot to the machine. To do this you will want to raise the presser foot lever. Place the presser foot on the needle plate so that the bar on the presser foot is in line with the slot on the shank. Then slowly lower the lever and it will snap into place. One quick note: make sure your needle is in the upright position. Step 3 – Mark the fabric on your project where you want the bottom of the buttonhole to end. This is vital because Janome buttonholes always start at the bottom, stitch up to the top, then turn around and come back down the other side to complete the buttonhole. Step 4 – Slide the project under the buttonhole foot. Align the red cross-hairs with your marking on the fabric. It is important to make sure the red markings (cross-hairs) on the presser foot line up with the middle of where you want the bottom of the buttonhole. Step 5 – Pull down the buttonhole lever which is located next to the needle. This awesome device will indicate to the machine where to stop the top of the buttonhole and turn around to complete the buttonhole. Step 6 – Begin to stitch your buttonhole. Allow the machine to come completely back around to your beginning stitches. To secure your buttonhole allow the machine to stitch over the first few stitches you made. Step 7 – The buttonhole is almost complete! Lift your presser foot lever and pull your project out, cutting away the strings. Then make sure to put a pin at the top and bottom of the buttonhole. This is important because you do not want to cut your stitches. Next, take your seam ripper or a small pair of scissors. You will then rip or cut down the middle of the buttonhole to open it up. Note: Test this out on a sample or scrap piece of fabric. This will ensure that the button you’re using fits correctly. Depending on the type of fabric you may need to use a stabilizer. |
|||
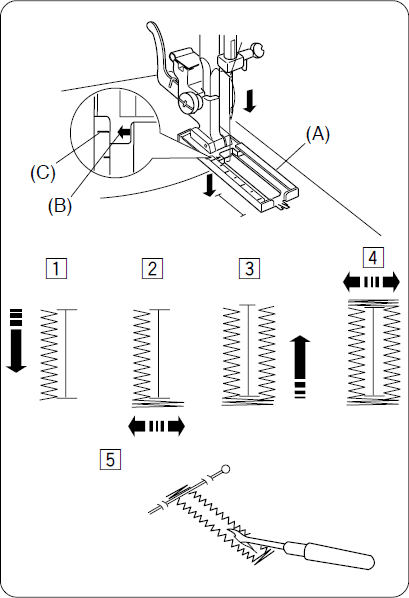
4-STEP BUTTONHOLE GUIDE
| Preparation: Step 1 – Mark buttonhole length on fabric and place the fabric under the foot with the buttonhole marking running toward you. Step 2 – Move the slider (A) toward you so that the top mark (C) on the slider meets the start mark (B). Line up the markings on the foot with the top mark on the fabric. Each engraved mark on the Buttonhole foot represents 5mm.Sewing the Buttonhole: Step 1 – Set the pattern selector dial to the first Buttonhole Step, and sew forward until you reach the front marking of your buttonhole (stopping when the needle is in the left position) Step 2 – Set the pattern selector dial to the second/fourth Buttonhole Step. Sew 5 tacking stitches and stop with the needle on the right side of the foot. Step 3 – Set the pattern selector dial to the third Buttonhole Step and sew until you reach the back marking of the buttonhole (stopping when the needle is in the right position). Step 4 – Set the pattern selector dial back to the second/fourth Buttonhole Step. Sew 5 tacking stitches and raise the needle from the fabric. Step 5 – Remove the fabric from the machine and cut the sewing thread. Then with a pin inserted into the top and bottom bartacks, cut the opening with a seam ripper. |
 |
|||
(If you are sewing multiple buttonholes, move the stitch selector away from the buttonhole stitch and then back on to the buttonhole stitch to reset the machine.)
This finishes up buttonhole 101 and we are so delighted you discovered how to sew some buttonholes with us at Janome. Our machines and buttonhole presser foot make it simple and enjoyable. Now that you are equipped with this fun knowledge of buttonholes you can choose which one is perfect for your project!