


Flower Stitch Feet Explained: Everything You Need to Know About this Foot
Nestled in the central suburbs of Brisbane, Janome Sewing Centre Everton Park was established in 1980, and continues to operate with a focus on helping customers achieve their sewing dreams. The family has been in the sewing business for more than 60 years and love seeing what people create with their machines. Read more about us here.
With our Product range you will find Professional Grade Quality and Modern Functionality at Great Value. Don't forget to take a look at our additional Free Bonus Gift offers.
Overlocking is an essential part of professional sewing, and with these domestic machines you can sew long lasting, neat professional finishes to your garments and accessories today.
Nothing adds a more personal touch to any work than fine embroidery. From monograms and logos to custom designs and elaborate patterns, embroidery can definitely make your work stand out.
Take your sewing to the next level and get the sewing machine accessories to help you with your next big sewing project.

Sewing on strung beads and pearls has always been a tedious task! But the beading foot add pleasures to embellishment. Popular for bridal wear, evening wear, smart/casual or crafts.

If you're searching for a part or product and just can't find it, get in touch! One of our helpful team members is available to assist you. We'll help you find the right items to get you up and sewing soon.
Send your inquiry to us
via email.
Or call us on 07 3355 5522
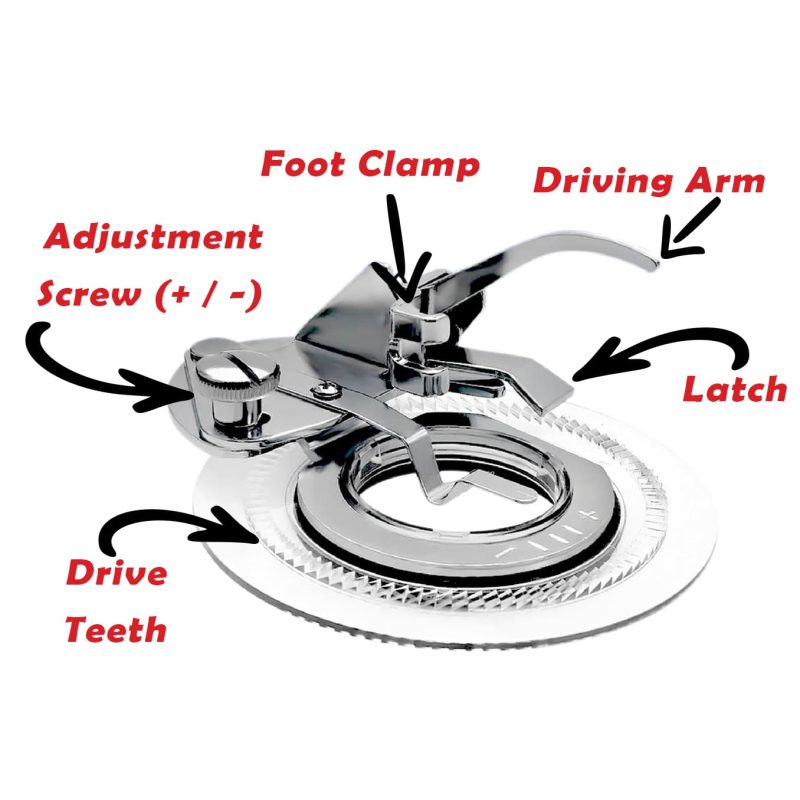
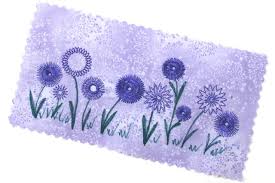
The Original Flower Stitch Foot can turn an everyday sewing machine into a circle stitcher. When combined with decorative stitches of various widths and thread colours, this foot allows the sewist to create beautiful flower-inspired circular motifs, amongst many other applications (including circular buttonholes). The flower stitch foot is a screw-on foot and can be used on machines with a low shank (more details below).
Stitch Pattern: Any Decorative Stitch
Stitch Tension: “Auto” or 4
Stitch Length: 0
Stitch Width: 2.5 to 7
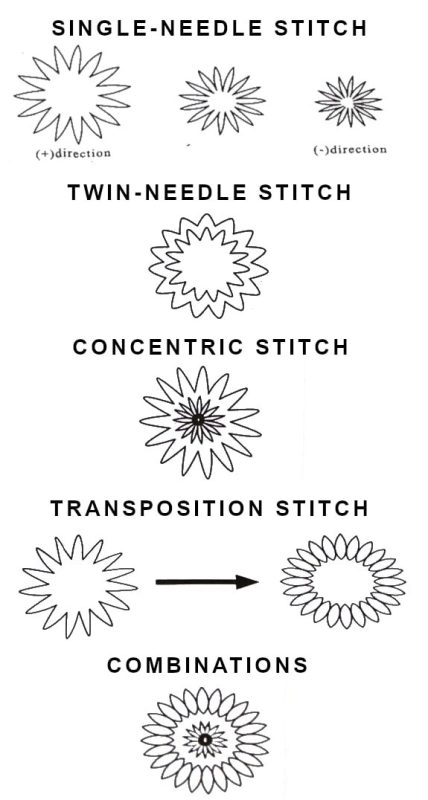
This is achieved by using a regular sewing needle and a decorative pattern of your choice.
By using a twin needle (up to 2mm wide), you can get an echo effect on your motifs. This effect is heightened by using contrasting thread colours.
Note: before stitching with a twin needle, it is recommended to turn the handwheel one full revolution to ensure that the needles with not strike the foot.
A Concentric Stitch effect can be achieved by creating two (or more) circular motifs at different widths (using the Adjustment Screw). Starting with the widest setting, complete the first pattern. Then without lifting your presser foot, loosen the Adjustment Screw and slide the Ring base towards the “-” mark. Then tighten the screw and complete the second pattern.
After stitching out the first pattern, lift the Driving Latch and rotate the Ring Base 3, 6, or 9 notches. Then complete the pattern. This can be repeated until you have achieved the desired effect.
Further variation can be achieved by combining concentric, transposition and twin-needle variations.
Stitch Pattern: Zig Zag
Stitch Tension: “Auto” or 4
Stitch Length: 0
Stitch Width: 2.0 to 2.5
Similar to a Transposition Stitch, a circular buttonhole is achieved by stitching out the first pattern circular and then moving the Ring Base 2 notches before repeating.
The flower stitch foot fits the following low shank sewing machine models:
Janome: 2160DC, 3160QDC, 4120QDC, 4300QDC, 5300QDC, 6019QC, 6025QC, 6260QC, CS995, DC2050, DC2101/LE, DC2150, DC3018, DC3050, DC3100, DC3200, DC4030, DC6030, DC7060, DC7100, DM7200, HD3000, HD5000, MC3000, MC3500, MC4000, MC4800, MC4800QC, MC4900QC, MC5000, MC5200, MC5500, MC5700, MC6000, MC6300, MC6500P, MC6600P, MC7000, MC7500, MS5027LE, MW3018 (My Excel 18W), MW3018LE, Sewist 625E, Sewist 740DC, Sewist 780DC, 4618QC, 5027, 5124, 652, 653, 654, 655, 655R (150), 659, ME4014, ME4015, ME4018, ME4123, Memory 7, MS2028, MS2522 , MX3123, SD2014, SR2000, SS2015, SW2018
Elna: 620, ELJ3210 (Easy Jeans), Elina 40, eXperience 510, 520, 5200, 530, 5300, 540, eXperience 550, eXperience 570, 660, 720, 7200, 740, 8600, 9600